From the moment I stepped into my grandmother’s countryside kitchen, filled with the warm scents of cinnamon and cardamom, I discovered that food is a language of love and memory. That’s where my passion for baking was born. Today, through Karamilla Sweets, I bring that same heart into every dessert I make. If you’ve ever wondered how to make Labubu cake, this is where tradition meets creativity wrapped in every soft, sweet bite.
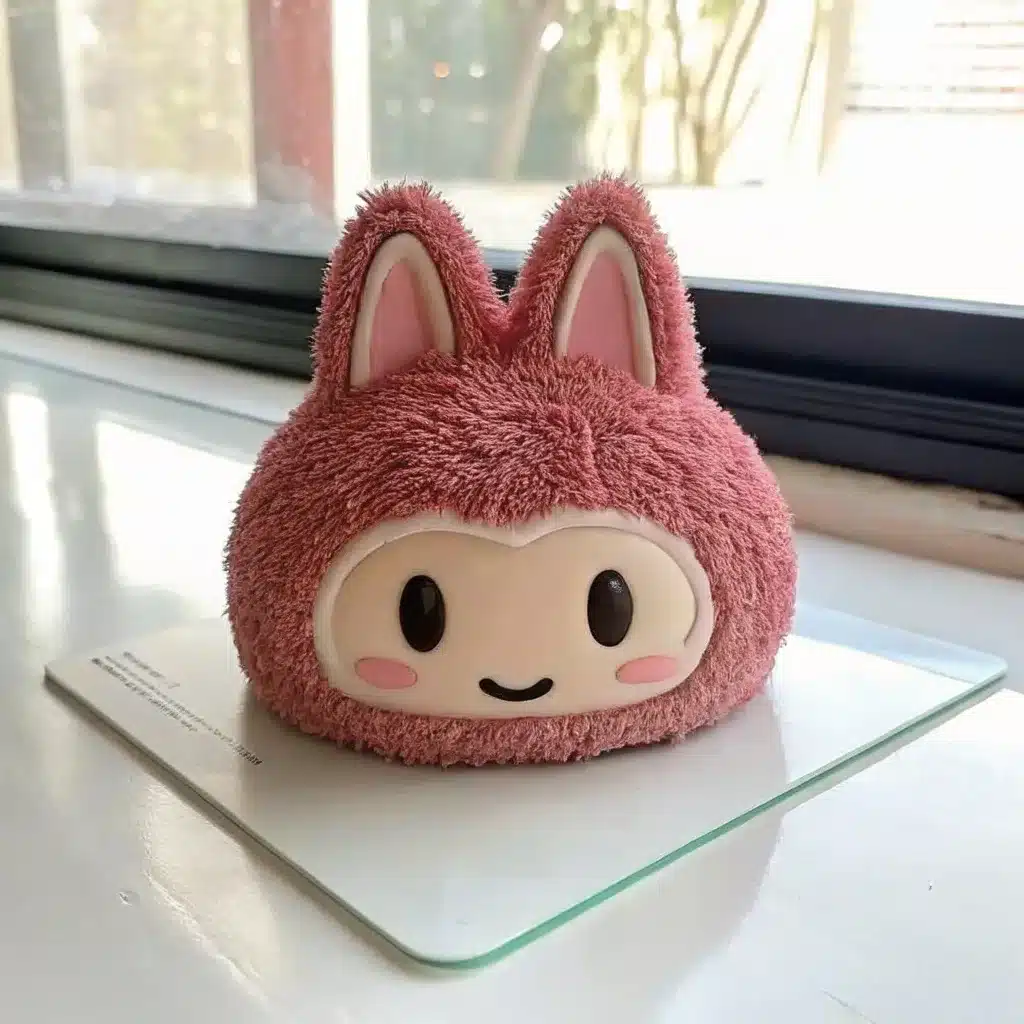
Table Of Contents
Table of Contents

Labubu Cake
Ingredients
To make a fluffy, sculptable sponge
- 1.5 cup all-purpose flour
- 1 cup granulated sugar
- ½ cup unsalted butter (room temperature)
- 3 LARGE eggs
- 1 tsp vanilla extract
- 1 tsp baking powder
- ½ tsp baking soda
- ½ cup whole milk
- 1 Pinch of salt
Here are two popular options:
Classic Buttercream
- 1 cup unsalted butter
- 3 cups powdered sugar
- 2 tsp heavy cream
- 1 tsp vanilla extract
Whipped Cream Filling
- 1 cups heavy whipping cream
- 2 cups powdered sugar
- ½ tsp vanilla extract
Optional Add-ins
- Cocoa powder (for chocolate sponge)
- Strawberry jam or Nutella (for filling layers)
- Gel food coloring (to bring Labubu’s features to life)
Instructions
- 👩🍳 Step-by-Step Guide: How to Make Labubu CakeLearning how to make Labubu cake starts with a simple batter and ends with a charming sculpted character. Follow these easy steps to bring Labubu to life in your own kitchen.To begin making your Labubu cake:Preheat your oven to 175°C (350°F). Grease and line your cake pans.In a large bowl, cream together ½ cup of unsalted butter and 1 cup of sugar until light and fluffy.Add 3 eggs one at a time, mixing well after each addition.Stir in 1 teaspoon of vanilla extract.In a separate bowl, whisk together 1½ cups of flour, 1 teaspoon of baking powder, ½ teaspoon of baking soda, and a pinch of salt.Gradually add the dry ingredients to the wet mixture, alternating with ½ cup of milk.Mix just until combined—this is a key part of how to make Labubu cake with a light texture.Pour the batter evenly into your prepared pans.Understanding how to make Labubu cake also means getting the bake just right:Bake the cakes for 25–30 minutes, or until a toothpick inserted in the center comes out clean.Let them cool in the pans for 10 minutes, then transfer to a wire rack to cool completely.Once cool, it’s time for the fun part of how to make Labubu cake—shaping the character:Level the cakes with a serrated knife or cake leveler.Stack the layers using your preferred filling (buttercream or whipped cream work best).Chill the layered cake for 30 minutes so it's firm enough to carve.Carve the general shape of Labubu’s head—an oval with small points for ears.Apply a thin crumb coat of frosting and chill for another 15 minutes to set the shape.🥣 Step 1: Preparing the Batter🔥 Step 2: Baking and Cooling🔪 Step 3: Shaping and Layering
Notes
- For a fluffier texture, substitute cake flour.
- Use templates or sketches for accurate sculpting.
- Create a Labubu Success Cake version by adding gold details and a congratulatory fondant plaque.
Nutrition
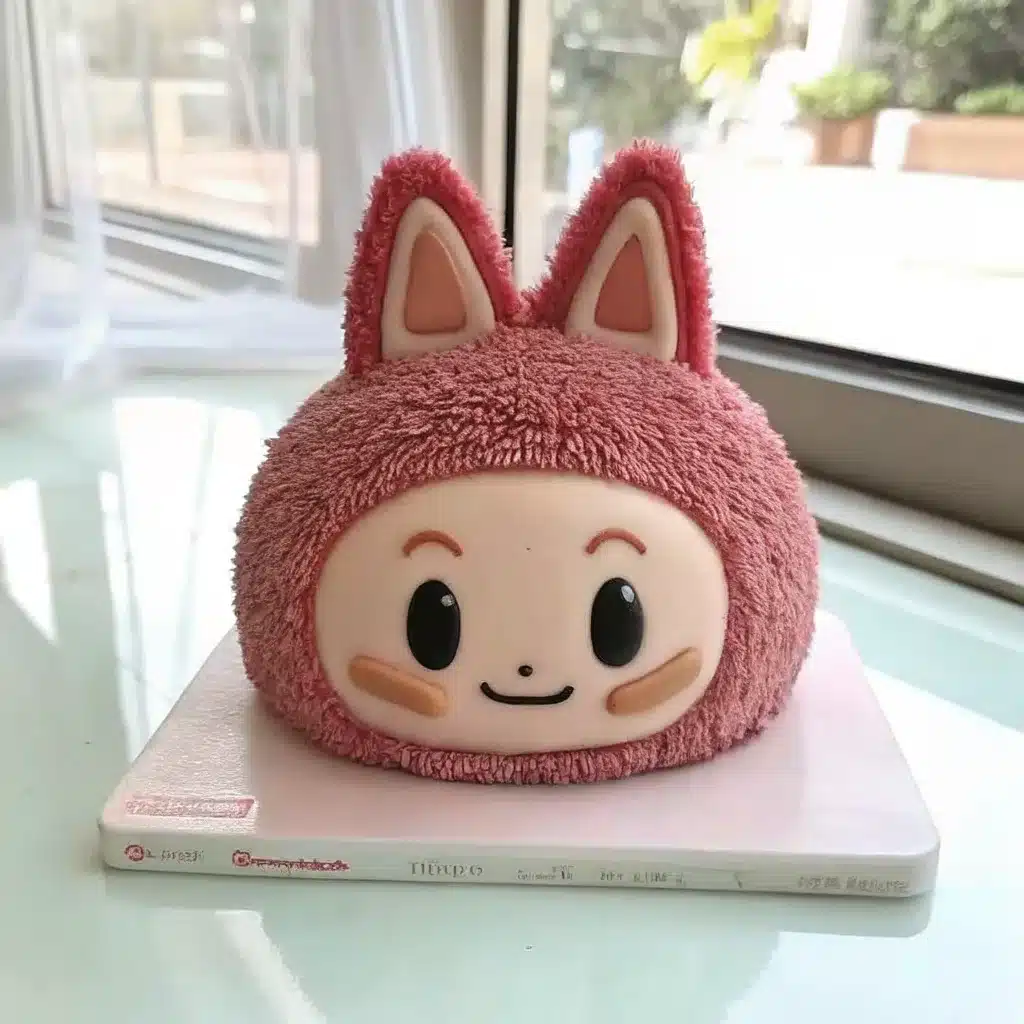
🍥 What Is Labubu Cake?
Labubu cake is more than a sweet treat it’s a creative expression with a story to tell. Inspired by the whimsical character from the POP MART universe, this cake brings Labubu to life with every detail, from its curious eyes and sharp ears to its signature cheeky smile. It’s become a favorite for themed parties, anime lovers, and anyone drawn to edible art with personality.
The trend first bloomed in Southeast Asia, where bakers began sculpting cakes into famous characters. Among them, Labubu stood out not just for its quirky charm, but for the skill it demands. And as more people searched for how to make Labubu cake, it quickly became a viral hit across social media.
🎨 What Makes Labubu Cake So Unique?
If you’re curious about how to make Labubu cake, it’s all about combining flavor, texture, and imagination. The base is typically a soft vanilla or chocolate sponge, layered with whipped cream or buttercream. Once assembled, it’s carefully carved and decorated to bring Labubu to life.
Why it stands out:
- Detailed character design – Every cake tells a story through Labubu’s iconic look.
- Room for creativity – Add flowers, hats, or holiday themes no two cakes are alike.
- Made to be shared – Labubu cakes are visual showstoppers, perfect for photos and celebrations.
Whether you’re a home baker or cake artist, learning how to make Labubu cake is a fun challenge. It’s not just baking it’s bringing a little piece of joy to life, one layer at a time.
🍓 Ingredients You’ll Need for Labubu Cake
If you’re learning how to make Labubu cake, the first step is gathering the right ingredients. Labubu cake requires a base that’s soft, moist, and easy to carve, along with frosting and fillings that bring the character to life.
🧁 Essential Ingredients for the Cake Base
To make a fluffy, sculptable sponge perfect for shaping into Labubu’s playful face you’ll need:
- 1 ½ cups all-purpose flour
- 1 cup granulated sugar
- ½ cup unsalted butter (room temperature)
- 3 large eggs
- 1 tsp vanilla extract
- 1 tsp baking powder
- ½ tsp baking soda
- ½ cup whole milk
- Pinch of salt
This sponge forms the perfect foundation when you’re figuring out how to make Labubu cake at home. It holds its shape for carving while staying deliciously soft.
🍫 Frosting & Filling Options
A big part of how to make Labubu cake is choosing the right frosting and filling to sculpt and decorate. Here are two popular options:
Classic Buttercream
- 1 cup unsalted butter
- 3 cups powdered sugar
- 2 tbsp heavy cream
- 1 tsp vanilla extract
Whipped Cream Filling
- 1 cup heavy whipping cream
- 2 tbsp powdered sugar
- ½ tsp vanilla extract
Optional Add-ins
- Cocoa powder (for chocolate sponge)
- Strawberry jam or Nutella (for filling layers)
- Gel food coloring (to bring Labubu’s features to life)
🌿 Substitutions for Dietary Needs
Still wondering how to make Labubu cake if you have dietary restrictions? Here are some easy swaps:
- Use almond or oat milk for a dairy-free version
- Replace eggs with applesauce or flaxseed meal for a vegan option
- Use gluten-free flour blends plus ½ tsp xanthan gum for structure
Regardless of your baking experience, mastering how to make Labubu cake begins with using the right ingredients. Once you’ve got these basics, the fun of decorating begins!
🛠️ Tools and Equipment for Perfect Labubu Cake
🎂 Baking Essentials
To create a Labubu cake that’s both delicious and structurally sound, you’ll need the right tools. Here’s your must-have list:
- 8-inch round cake pans (2 or 3, depending on layers)
- Electric mixer or stand mixer for smooth batter and frosting
- Mixing bowls (at least 2 sizes)
- Measuring cups and spoons for accuracy
- Cooling racks to prevent soggy bottoms
- Offset spatula for even frosting
- Cake leveler or serrated knife for trimming layers
These basics ensure your cake bakes evenly and is easy to assemble.
🎨 Decorating Tools for Labubu’s Signature Look
Labubu’s charm lies in the details. To bring the character to life, you’ll need:
- Piping bags and tips (round and star tips for fur texture)
- Fondant tools for sculpting facial features
- Gel food coloring (black, white, pink, and brown)
- Modeling chocolate or fondant for ears, eyes, and teeth
- Toothpicks or skewers for fine detailing
- Turntable for smooth frosting and decorating
Optional but helpful:
- Edible markers for drawing expressions
- Silicone molds for consistent shapes
With these tools, you’ll be ready to sculpt, frost, and finesse every detail of your Labubu cake like a pro.
👩🍳 Step-by-Step Guide: How to Make Labubu Cake
Learning how to make Labubu cake starts with a simple batter and ends with a charming sculpted character. Follow these easy steps to bring Labubu to life in your own kitchen.
🥣 Step 1: Preparing the Batter
To begin making your Labubu cake:
- Preheat your oven to 175°C (350°F). Grease and line your cake pans.
- In a large bowl, cream together ½ cup of unsalted butter and 1 cup of sugar until light and fluffy.
- Add the 3 eggs one at a time, beating well after each to ensure a smooth and stable batter an essential step in how to make Labubu cake with a light, even texture.
- Stir in 1 teaspoon of vanilla extract.
- In a separate bowl, whisk together 1½ cups of flour, 1 teaspoon of baking powder, ½ teaspoon of baking soda, and a pinch of salt.
- Gradually add the dry ingredients to the wet mixture, alternating with ½ cup of milk.
- Mix just until combined this is a key part of how to make Labubu cake with a light texture.
- Pour the batter evenly into your prepared pans.
🔥 Step 2: Baking and Cooling
Understanding how to make Labubu cake also means getting the bake just right:
9. Bake the cakes for 25 to 30 minutes, or until a toothpick inserted into the center comes out clean and free of crumbs this ensures your Labubu cake is fully cooked and ready for shaping.
10. Allow the cakes to rest in their pans for 10 minutes to set, then carefully remove and place them on a wire rack to cool down completely before shaping and decorating.
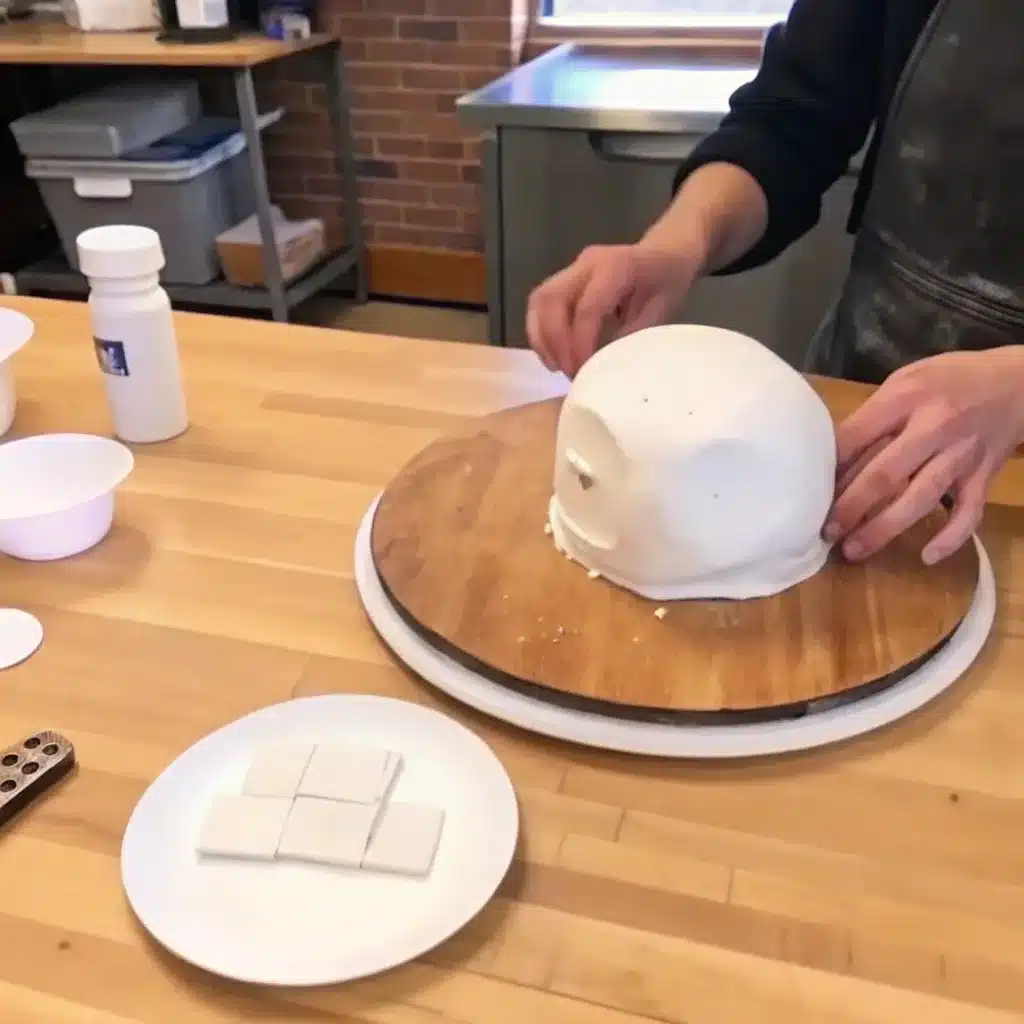
🔪 Step 3: Shaping and Layering
Once cool, it’s time for the fun part of how to make Labubu cake shaping the character:
- Level the cakes with a serrated knife or cake leveler.
- Stack the layers using your preferred filling (buttercream or whipped cream work best).
- Chill the layered cake for 30 minutes so it’s firm enough to carve.
- Carve the general shape of Labubu’s head an oval with small points for ears.
- Apply a thin crumb coat of frosting and chill for another 15 minutes to set the shape.
🎨 Decorating the Labubu Cake: Bring Your Character to Life
Once your cake is carved and chilled, the final and most creative step in how to make Labubu cake is decorating it with all the signature features that make this character so lovable.
🖌️ Sculpting Labubu’s Signature Features
Now that your crumb coat is set, it’s time to transform your cake into Labubu’s expressive face. This step is where learning how to make Labubu cake really becomes a work of edible art.
- Shape the Head: Using a serrated knife, refine the top of the cake into a rounded oval with a slightly tapered chin to mimic Labubu’s head shape.
- Add the Ears: Mold two pointy ears using fondant or modeling chocolate. Secure them onto the cake using skewers or toothpicks.
- Create the Eyes and Teeth: Roll white fondant into ovals for the eyes and tiny rectangles for the teeth. Add pupils and details with black fondant or food-safe markers.
- Sculpt the Nose and Smile: Form a small triangle for the nose and use a curved carving tool or piping bag to craft Labubu’s classic cheeky grin with black frosting or fondant.
Each sculpting detail adds personality, making this step essential in how to make Labubu cake that truly stands out.
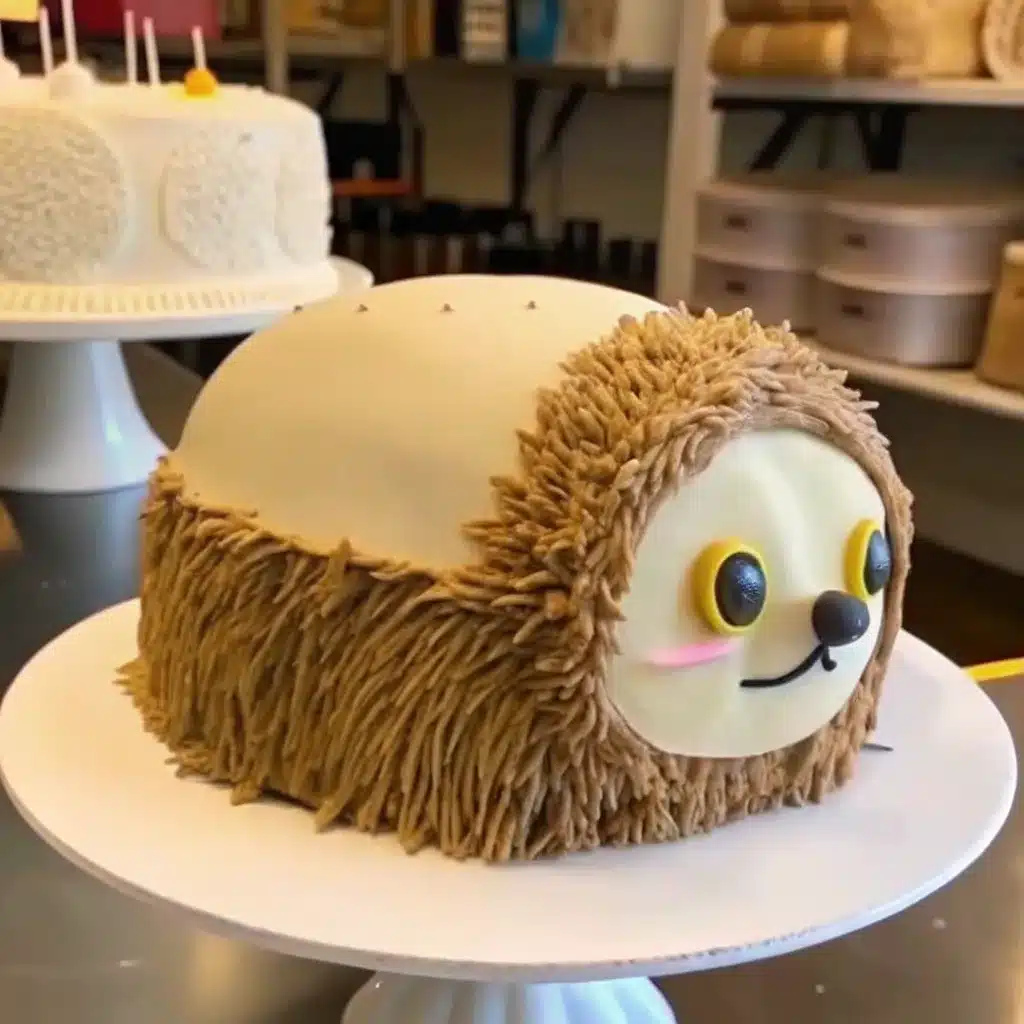
🌈 Coloring and Texture Tips
Understanding how to make Labubu cake means capturing both the form and the expression. Use these decorating techniques to nail the look:
- Fur Texture: Using a star piping tip, apply chocolate or tinted buttercream in short, spiky strokes to create Labubu’s playful fur effect.
- Color Accuracy: Blend gel food colors to achieve Labubu’s soft brown, pale pink, and creamy white tones. Use food brushes or sponges for smooth shading and depth.
- Expression Details: Add Labubu’s mischievous charm with edible markers draw eyebrows, blush marks, and tiny line details to bring the face to life.
✨ Optional Finishing Touches
Want to take your creation even further? As you master how to make Labubu cake, feel free to add:
- A fondant flower crown for a cute touch
- Holiday accessories like a Santa hat or bunny ears
- Custom facial expressions or theme-specific outfits
Decorating is where your creativity truly shines. With every piped line and painted detail, you’re not just learning how to make Labubu cake you’re creating a little piece of edible joy.
⚠️ Common Mistakes and How to Avoid Them
🧁 Baking Blunders
1. Overmixing the Batter
Overmixing can lead to a dense, rubbery cake. Mix just until the ingredients are combined lumps are okay!
2. Uneven Baking
If your cake domes or bakes unevenly, try using cake strips or rotating the pans halfway through. Before taking the cakes out of the oven, insert a toothpick into the center if it comes out clean, they’re ready to cool.
3. Dry Texture
This usually happens from overbaking. Stick to the recommended time and keep an eye on the edges they should be golden, not brown.
🎨 Decorating Dilemmas
1. Crumb Chaos
Skipping the crumb coat or not chilling the cake can cause crumbs to mix into your final frosting. Always chill between coats!
2. Melting Frosting
Buttercream can start to melt if your hands are too warm or the kitchen temperature is high, so work in a cool environment whenever possible. Chill your tools and work in a cool space for best results.
3. Lopsided Sculpting
If Labubu’s face looks off-balance, use a printed template or sketch the shape on parchment paper first. Measure twice, carve once!
4. Color Bleeding
Excess gel coloring or too much moisture can make colors bleed. To prevent this, use gel colors sparingly and allow each layer to dry fully before adding fine details.
🧊 Storage, Serving, and Presentation Tips
Once you’ve learned how to make Labubu cake, it’s important to store and serve it properly to keep both the flavor and design intact. These tips will help you preserve freshness and make a stunning impression when it’s time to present your creation.
🧼 How to Store Labubu Cake for Maximum Freshness
Proper storage is a key part of mastering how to make Labubu cake, especially since it often includes delicate buttercream or whipped cream.
- Short-term (1–2 days): Place your finished Labubu cake in an airtight container and store it in the refrigerator. Before serving, let it rest at room temperature for 20–30 minutes to soften the frosting.
- Long-term (up to 1 week): For longer storage, wrap the cake tightly in plastic wrap and aluminum foil, then refrigerate. For best results, store the cake layers undecorated and frost only when you’re ready to serve.
- Freezing: If you’re prepping ahead while learning how to make Labubu cake, freeze the sponge layers (without frosting) for up to 2 months. Wrap them well in plastic and foil. When ready to use, thaw overnight in the fridge.
💡 Tip: Avoid storing Labubu cake near strong-smelling foods nobody wants a dessert that smells like garlic or onions!
🎉 Serving and Presentation Ideas
One of the joys of knowing how to make Labubu cake is showing it off! Here’s how to present it beautifully:
- Display with flair: Use a rotating cake stand for smooth slicing and an elegant display.
- Add themed details: Personalize your Labubu cake with props like edible glitter, mini balloons, or custom fondant name tags.
- Capture the magic: Photograph your cake in soft, natural light against a simple background perfect for Instagram, Pinterest, or your baking portfolio.
- Serve with style: Pair your Labubu cake with matching cookies or cupcakes for a full dessert table. It’s a great way to showcase everything you’ve learned about how to make Labubu cake in a party setting.
🍴 Pro tip: For clean, sharp slices that preserve Labubu’s face, dip your knife in hot water and wipe it dry between cuts.
With the right storage and a thoughtful presentation, your knowledge of how to make Labubu cake will shine from the first look to the final bite.
🌟 Variations: Labubu Success Cake & More
🧁 Labubu Success Cake: A Celebration Upgrade
The Labubu Success Cake is a leveled-up version of the classic, often made for graduations, promotions, or milestone birthdays. What makes it special?
- Flavor Boost: Add layers of chocolate ganache or fruit compote between sponges.
- Gold Accents: Use edible gold leaf or metallic dust to highlight Labubu’s features.
- Message Plaque: Add a fondant scroll with a congratulatory message like “You Did It!” or “Success!”
This version is all about elegance and celebration while keeping Labubu’s playful charm.
🐰 Lafufu Cake: The Adorable Cousin
Lafufu Cake is a variation inspired by another POP MART character—rounder, softer, and often pastel-colored. To make it:
- Opt for a light, airy sponge such as chiffon or angel food cake to make shaping and layering easier.
- Decorate with pastel buttercream and floral accents.
- Sculpt rounder ears and cheeks for a cuter, more innocent look.
Perfect for baby showers, spring parties, or anyone who loves kawaii aesthetics.
🍓 Flavor Twists and Seasonal Spins
Want to make your Labubu cake stand out even more? Try these:
- Matcha sponge + red bean filling for a Japanese twist
- Pumpkin spice cake with cream cheese frosting for fall
- Lemon blueberry layers for a fresh summer vibe
- Red velvet base for Valentine’s Day or romantic themes
These variations keep the base technique intact while letting you play with flavor and mood.
For more recipes you can follow me on Pinterst or Facebook.
❓ FAQ’s
What is a Labubu cake?
A Labubu cake is a character-inspired cake modeled after the POP MART figure “Labubu.” It’s typically made from sponge cake and decorated with buttercream, fondant, or modeling chocolate to sculpt Labubu’s playful facial features and expressive eyes.
What flavors are available for Labubu cake?
Labubu cakes can be customized to suit any palate. The most popular flavors include vanilla, chocolate, and matcha. Some bakers add seasonal twists like pumpkin spice, red velvet, or even fruit compote fillings.
What type of frosting is used?
Buttercream is the go-to choice for Labubu cakes. It’s easy to sculpt, holds its shape well, and can be colored to match Labubu’s character design. Whipped cream and ganache are also great alternatives for lighter textures or richer taste.
Can I make a Labubu cake myself?
Absolutely! With the right tools, clear step-by-step instructions, and a bit of patience, anyone can make a Labubu cake at home. It’s a rewarding project for both beginners and seasoned bakers who love a creative challenge.
Is fondant necessary for Labubu cakes?
Fondant is ideal for sculpting fine features like eyes, ears, and teeth, but it’s not strictly necessary. You can also use modeling chocolate, piped buttercream, or edible markers depending on your style and skill level.
How long does a Labubu cake last?
If refrigerated in an airtight container, a fully decorated Labubu cake stays fresh for up to 3 days. Unfrosted sponge layers can be frozen for up to 2 months and decorated later.
Conclusion: How to Make Labubu Cake the Right Way
Mastering how to make Labubu cake is more than following a recipe—it’s embracing a nostalgic dessert that’s light, moist, and full of coconut flavor. Whether you’re baking it for a special occasion or a simple family treat, Labubu cake delivers the perfect blend of tradition and sweetness.
By understanding the key steps from whipping the eggs properly to folding the ingredients gently you’ll get that signature fluffy texture every time. Don’t forget to use quality desiccated coconut and avoid overbaking to keep the cake soft and airy.
Now that you know how to make Labubu cake, why not share it with loved ones or explore fun flavor variations? Try pairing it with a drizzle of condensed milk, fresh fruit toppings, or even a layer of whipped cream.
For more nostalgic bakes and heritage-inspired sweets, check out our other recipes like How to Make Labubu Success Cake and How to Make Lafufu Cake.